Building an Azure Maps Creator front-end with .NET 6, Blazor and Fluent UI
Click to read:
Last month the annual Microsoft Build conference was held and, as always, a lot of exciting new things were announced. Instead of giving you a rundown of all the shiny new bits (which can be found in a lot of other places), I decided on building a proof of concept in which a couple of these new parts will be used together. The things I'll focus on are:
- .NET 6 (in particular the Hot Reload functionality)
- Azure Maps Creator (AMC)
- FAST (Fluent UI) Blazor components
Let's discuss each of them in a bit more detail first. Oh, and to set expectations, a disclaimer: not all of these are in a fullly released and supported state yet, so no guarantees on a polished end result...
.NET 6
.NET 6 is the final step in the .NET unification plan that started with .NET 5. Unification in this case means that we will get a single .NET runtime and framework that can be used everywhere (Windows, Mac, Linux, iOS, Android) and that has uniform runtime behaviors and developer experiences. The capabilities of .NET are expanded by taking the best of .NET Core, .NET Framework, Xamarin and Mono into a single code-base that developers (Microsoft and the community) can work on and expand together and that improves all scenarios.
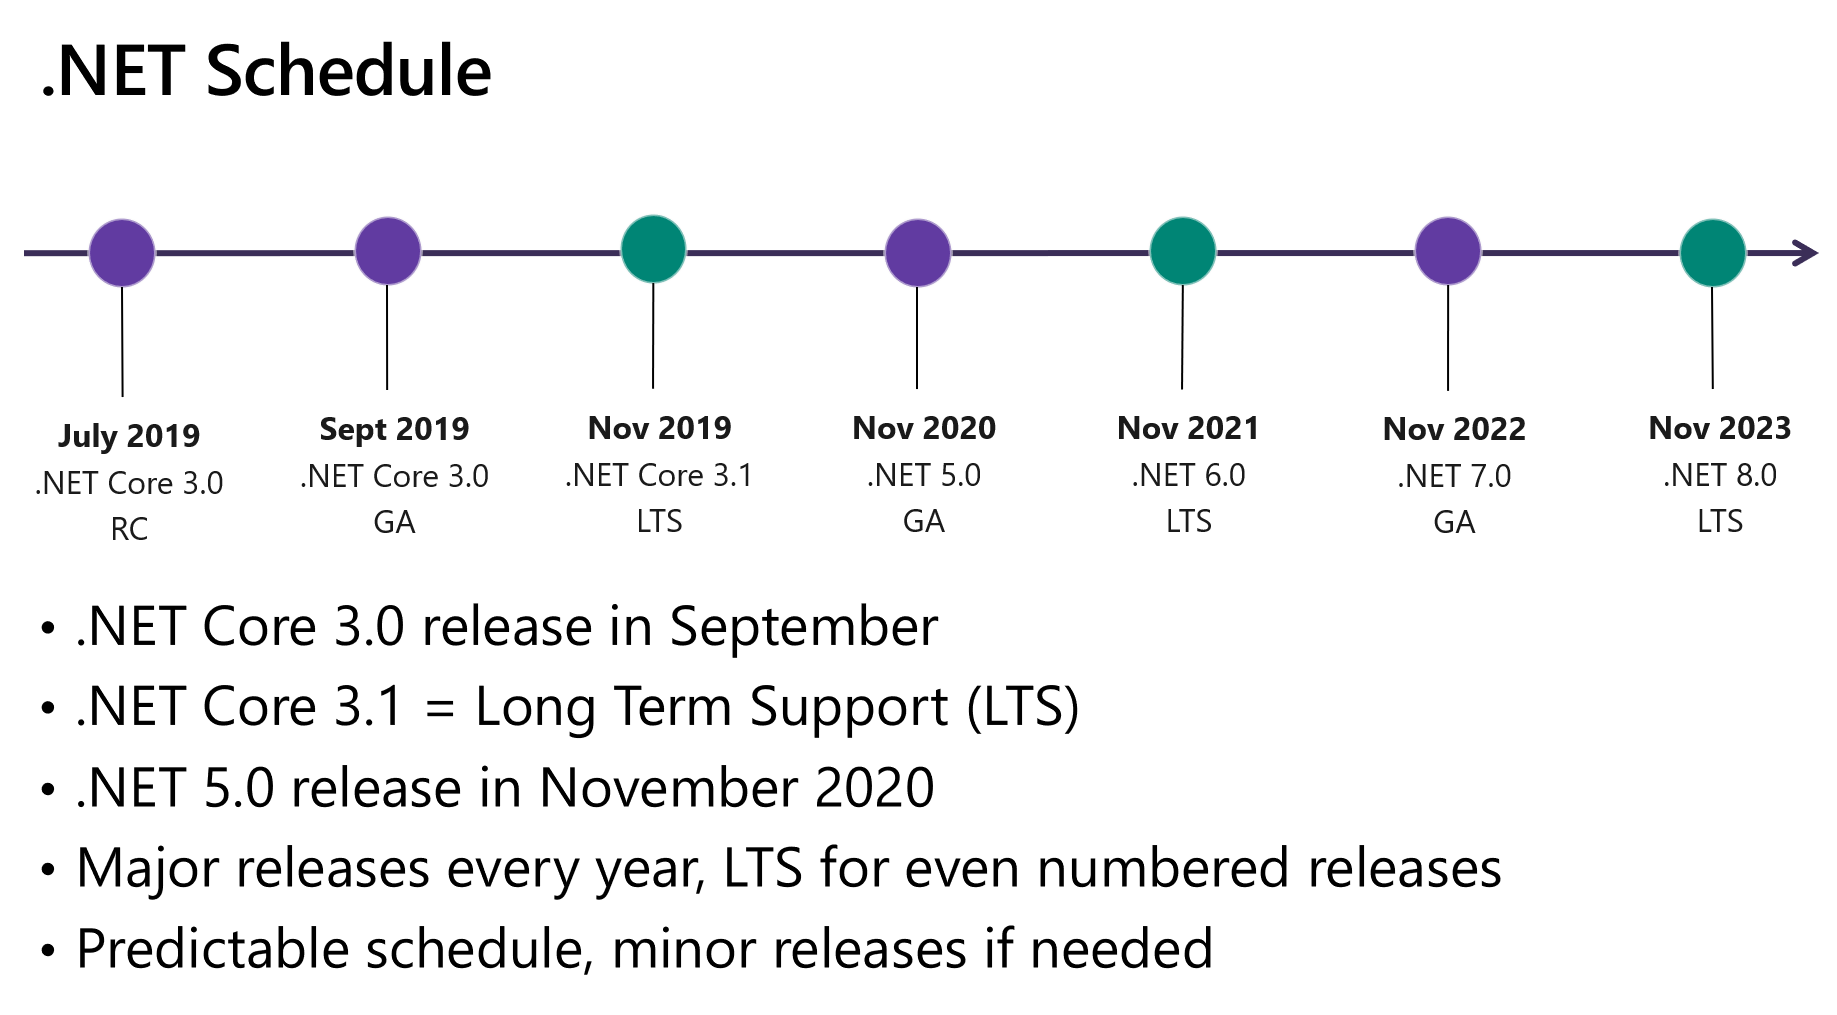
At Build .NET 6 Preview 4 has been released. Many features are in close-to-final form and others will come soon. Preview 4 establishes a solid base for delivering the final .NET 6 bits during .NET Conf 2021 on November 9th.
As can be seen from the image below, .NET 6 will be supported for three years as a Long Term Support (LTS) release.
Besides the unification, a lot of new features will be made available as well. To name a few:
- Hot Reload: Hot Reload is a new experience that enables you to make edits to your app’s source code while it is running without needing to manually pause the app or hit a breakpoint.
- .NET Multi-platform App UI
- Simple web APIs
See this site for a much deeper overview.
Azure Maps Creator
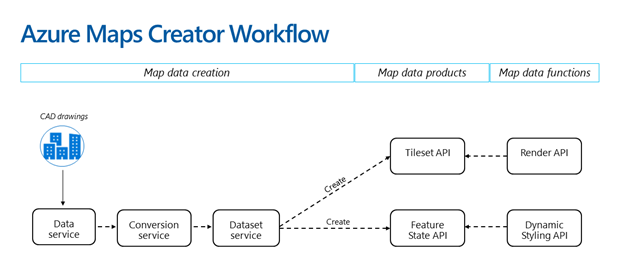
After being announced and made available as a preview last year, Azure Maps Creator is now generally available. At its core, Azure Maps Creator provides an end-to-end solution for private indoor mapping, enabling you to Convert your facility floor plans into indoor map feature data. The indoor map features are stored as a Dataset which is used to power downstream services while the Web Feature Service (WFS) offers data management and querying. Tile sets are created to provide data visualization while the Feature State set provides a method to dynamically reflect real-time events on distinct visual features such as showing temperature in and occupancy of rooms .
Azure Maps Creator is available initially in the following regions: West US 2, East US 2, West Europe and North Europe. The latest version of the API (V2) and the second generation of the Azure Maps Business Model are also available in this GA.
FAST (Fluent UI) Blazor components
Fluent UI is a collection of user experience frameworks for creating beautiful, cross-platform apps that share design, and interaction behavior. FAST is a collection of technologies built on Web Components and modern Web Standards, designed to help you efficiently tackle some of the most common challenges in website and application design and development. The FAST-team has already made available ways to integrate the Web Components in a Blazor App (as I've written about in an earlier post). Now they are going one step further and are working together with the Blazor team to build a library of native Blazor Components that are wrapping the FAST Web Components which are using the Fluent UI Design System. I'm really looking forward to this library and am actively contributing by submitting pull requests. However, at the time of writing this the library is only at version 0.2. The potential is there but it is not really useable yet as a couple of components can not be bound yet (meaning you can input data but cannot retrieve that data in code). As a fallback, I'll be using the BlazorFluentUI library (of which I'm one of the maintainers) I've mentioned a couple of times before.
So, what do I want to build?
As said, the Azure Maps Creator functionality is generally available now. You interface with it by using the available REST API's. If you go through the docs, you'll see the examples are done by leveraging Postman. Of course you could use any other REST toolbox as well. I thought it would be a nice idea to try to combine the three parts discussed above and come up with a simple UI for working with the Maps Creator API. Lets start!
From a REST API to something to use in an C# program
There are many ways that you can work with REST API's from C# in general and the Azure REST API's in particular. By far the easiest way for Azure is to use the Azure SDK's. There are packages for a large number of languages and they offer a consise and productive way of interacting with Azure services. Unfortunately there is no C# SDK yet for Azure Maps Creator. I say 'yet', because work is underway to build one and updates are being made as I'm writing this. To facilitate the proces of creating a lot of the Azure SDK's Microsoft is using a tool that generates the lanquage specific code (C#, TypeScript, Java, Go, ...) from the OpenAPI (Swagger) specifications. That tool is called AutoRest and is (of course) also available as open source on GitHub. Using this tool, the available REST API specifications and the mentioned in-development SDK, I tried to generate an 'almost up-to-date private pre-release' version of the library I could use in my C# code. I got as far as compiling the generated code, but everything in the library was being created as internal classes. Not very usefull for a library! Conclusion: for now this is not yet useable and I will revisit this option once the SDK is made available.
Next, I tried leveraging the Azure Maps REST Toolkit. I submitted a PR to update the library to .NET 5 (up from .NET Standard 2.0) and switch from using Newtonsoft.Json to System.Text.Json. (PR has now been merged and version 7 of the library is available.) Unfortunately this library does not yet support version 2 of the API's so it cannot be used for the Maps Creator part. Adding support for this could be done, but with the work taking place on the official SDK that might turn out to not be very efficient use of time. Conclusion: The Azure Maps REST Toolkit is a great piece of utility sftware, but not useable for the Maps Creator part.
To get something I could use in a C# program I finally decided to use the excellent RestSharp library. From their site: The main purpose of RestSharp is to make synchronous and asynchronous calls to remote resources over HTTP. As the name suggests, the main audience of RestSharp are developers who use REST APIs. However, RestSharp can call any API over HTTP (but not HTTP/2), as long as you have the resource URI and request parameters that you want to send comply with W3C HTTP standards. It happens to also be integrated within Postman. So while going through the tutorial (see below), I was able to gather code fragments I could use in my program. One step forward...
UI Workflow
My end goal for what I want to build is to have a simple front-end for the steps described in the Tutorial: Use Microsoft Azure Maps Creator to create indoor maps. To sum it up the following steps need to be taken:
- Upload the floor plans
- Convert them to map data
- Create a collection of map features (Dataset)
- Create a set of vector tiles that render on the map
- Run a query on the dataset
- Create a dynamic property and values on specific features that support them (Occupancy of a room)
You can see that by following these steps we are basically following the Worklow image that was shown earlier. I'll re-use the data from the tutorial as much as possible so you can have a side-by-side comparison of the responses.
The code
I started by creating a Blazor Server App targetting .NET 6 (preview 4 at the time of writing). Next I installed the BlazoreFluentUI package from NuGet (version 5.3.3-CI-20210614-084251). Then I added the RestSharp (106.11.8-alpha.0.14) package. And finally, I added the Blazored.LocalStorage (4.1.2) component to store some settings (like the Primary Key) in your browser so you don't have to type them in everytime. All the code is of course available on my GitHub. The primary key that you can see in the screenshots has been recycled since the screenshots were taken. Ready, set, go...
The home page
The app starts with a page giving an overview of the steps we discussed before. It also alows you to pick the region where your commands will be executed and allows you to enter the key with which you are authorized to execute the commands. The values are stored in the local storage of your browser and are not being logged on the server. Here is how it looks:

And yes, the obligatory dark theme is supported. The menu on the right of the page, gives access to the different steps of the process As this is a PoC, I'm not checking if you are doing things in the right order. That is all up to you. For the clarity of this text, I will walk through them in the right order here.
Upload a Drawing package
It all needs to start with uploading a zip file that contains your floor plans and a manifest.json file describing them. You can select a file from your local drive and it will then be uploaded to the Azure Maps Creator environment in the region you selected. Before the file can be send, a temporary copy needs to be made on the server. Once the upload is done, the file will be deleted from the server again.

If initiating the upload went okay, the 'Upload Map Data Status' button will be enabled and you can check the progress being reported from AMC. If the upload and processing is done, an identifier for the data will be returned and the other two buttons are enabled. With that identifier you can query for the metadata or you can delete the data from your Azure Maps Creator instance. I'm using a C# 9 record for storing the metadata and make use of the built-in ToString() capabilities of these records to display the result:

Convert a Drawing Package
The convert page is pretty simple. It only has two buttons. One to start the conversion of the floor plans to map data and one to check on the status of the conversion. Status check is enabled once the conversion is successfully started. For the fans a screenshot in dark mode:

The unique identifiers for the uploaded data and the converted data are shown as feedback.
Create a Dataset
Next you need to create a Dataset (a collection of map features, such as buildings, levels, and rooms). The steps needed are equal to the convert action described above. You first initiate the Dataset Create action and then you have a second butto to check on the creation status. You get the conversion and dataset id's as feedback on the screen:

Create a Tileset
The process then repeated one final time to create the Tileset. A tileset is a set of vector tiles that render on the map. Tilesets are created from existing datasets. However, a tileset is independent from the dataset from which it was sourced. If the dataset is deleted, the tileset continues to exist. It gets the Dataset ID as input and you get back a Tilset ID when the process is finished.

Query datasets with WFS API
Datasets can be queried using WFS API. You can use the WFS API to query for all feature collections or a specific collection. Just like in the tutorial, you can do both. First we'll query all collections, and then we will query for the unit collection. For this PoC I'm not going to format the returned (Geo)JSON so two large strings will be outputted to your screen:

Create a Feature stateset
In this final step, I'll again follow the tutorial so I'm defining a Feature statesets that to create dynamic properties and values on specific features that support them. In this step, I'll create a stateset that defines boolean values and corresponding styles for the occupancy property.
After the update completes, you'll receive a 200 OK HTTP status code (in the GUI it shows a message bar). If you implemented dynamic styling for an indoor map, the update displays at the specified time stamp in your rendered map. You can use the Feature Get Stateset API to retrieve the state of a feature using its feature id. You can also use the Feature State Delete State API to delete the stateset and its resources.

Well, I started this post by saying I might not reach a succesfull end state, but all in all I think we can call this a success after all. As said, al source is available. Feel free to clone, change and run it yourself. Comments and remarks are always welcome.
Hope this helps!
Comments
Comments are closed